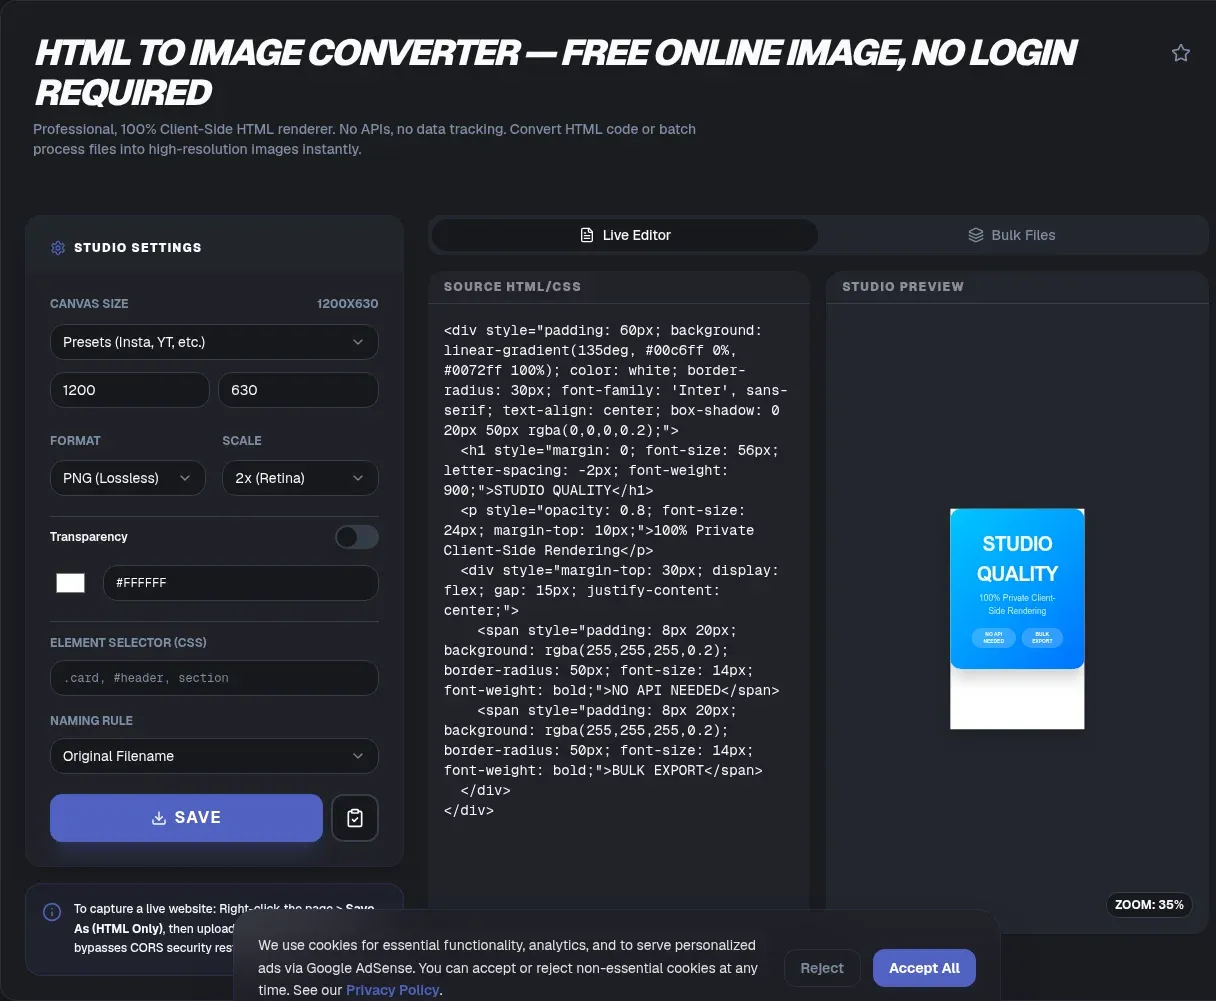
ToolSura's HTML to image converter turns any markup into a finished PNG, JPEG, WebP, or AVIF file in your browser. If you searched for a way to convert HTML to JPEG, or you need to convert HTML to PNG for a component, the answer is one paste away. Rendering runs entirely on your device, so there is no upload, no signup, and no server queue. Your HTML never leaves your device at any point.
That local pipeline matters more than it sounds. Server-based converters ship your markup to a render farm and return a bitmap that often drifts from your real layout. A client-side render skips the round trip, matches the browser you are already looking at, and keeps working offline once the page loads. Unreleased designs stay private by default.
Key takeaways
- Every export renders in your browser through SVG
<foreignObject>and canvas, so your markup never leaves your device. - Choose PNG for lossless text, JPEG for smaller photos, WebP or AVIF for the web (MDN).
- JPEG has no alpha channel, and quality 60 cuts file size by 79% (web.dev).
- Scale to 2x for retina-sharp captures (MDN).
What Is an HTML to Image Converter?
An HTML to image converter rasterizes markup into a downloadable PNG or JPEG in seconds, no headless browser required. The approach leans on the SVG <foreignObject> element, which MDN describes as a way to embed live HTML inside an SVG. The W3C SVG spec requires the wrapped node to declare the XHTML namespace. One implementation of this technique, the html-to-image library, logged 6,444,612 npm downloads in the week ending 2026-08-28 (npm registry).
Most renderers follow a shared path from there: wrap your HTML in an SVG, paint it onto a canvas, hand back a bitmap. Because the browser's own engine does the painting, the output matches how the page actually renders instead of a rough CSS imitation. ToolSura builds on that lineage, which moved from dom-to-image to the maintained html-to-image library.
Why ToolSura's HTML to Image Converter Is Different
ToolSura's converter renders locally, while most rivals upload your code to a server. Server renderers rebuild CSS imperfectly and add network latency. ToolSura uses the browser's own engine, so the output matches the live page, with no account, no backend, and no per-day export cap.
The local flow also works offline. Render a share card on a plane, without touching the internet. Nothing leaves the browser, which simplifies compliance reviews for healthcare, finance, and internal-tooling teams. Because the compute is yours, there is no watermark, no queue, and no metered API bill.
The privacy boundary is the practical difference. Markup that never reaches a server cannot be logged, cached, or subpoenaed downstream. For an unreleased pricing page, that is the whole argument for a browser-native converter.
How to Use the Converter
The converter turns markup into a file in about the time it takes to paste and click, since there is no server round trip. The editor accepts a full document or a single fragment, and the preview refreshes as you edit.
- Paste or load your HTML into the editor panel, including any inline
<style>blocks. - Check the live preview, which renders your markup exactly as the browser would display it.
- Pick a format from the export toggle: PNG, JPEG, WebP, or AVIF. PNG, WebP, and AVIF carry transparency; JPEG does not.
- Set quality and scale. Quality applies to the lossy formats, and scale controls sharpness, so use 2 for retina output. Choose a background color here if you want a solid fill.
- Click download to save the file straight to your device. No account, no upload, no watermark at any step.
How HTML Becomes a Pixel Image
ToolSura follows the sequence documented in the library's GitHub README and explained at surma.dev. Here is the route, start to finish.
First, the tool clones your target DOM node and copies computed styles, including ::before and ::after pseudo-elements. It inlines web fonts and images as base64 data URLs so nothing fetches at render time, then serializes the styled node to XML. That XML is wrapped in a <foreignObject> inside an <svg>, drawn onto an off-screen canvas with drawImage() as MDN documents, and exported through toBlob per the WHATWG HTML Living Standard. The result is a Blob you download directly.
| Step | What happens |
|---|---|
| 1. Clone | Recursively copy the target DOM node |
| 2. Styles | Copy computed CSS, including pseudo-elements |
| 3. Inline | Embed fonts and images as base64 data URLs |
| 4. Serialize | Convert the styled node to XML |
| 5. Wrap | Nest XML in <foreignObject> inside an <svg> |
| 6. Paint | Draw the SVG onto a canvas with drawImage() |
| 7. Export | Hand back a Blob via toBlob / toDataURL |
PNG, JPEG, WebP, or AVIF: Which Format Should You Export?
Four facts decide this before taste does. MDN caps JPEG at 65,535 by 65,535 pixels, allows PNG dimensions up to 2,147,483,647, and lists WebP at 16,383. Only three of the four formats carry an alpha channel. The two newer formats also beat JPEG on size at similar quality, with 96.18% browser support for WebP (caniuse) and 94.67% for AVIF (caniuse).
Use PNG when the export is mostly text, UI, or line art. MDN recommends lossless formats for screenshots because "text easily becomes fuzzy and unclear under lossy compression," and "PNG is preferred over JPEG for more precise reproduction of source images, or when transparency is needed."
Use JPEG when the export is photographic. Wikipedia's JPEG reference puts typical compression at 10:1 with little perceptible loss, so a photo card drops from megabytes to kilobytes.
Use WebP or AVIF when the file is headed for the web. MDN reports lossy WebP 25 to 35 percent smaller than comparable JPEG and lossless WebP 26 percent smaller than PNG, while web.dev lands AVIF around 50 percent smaller than JPEG with alpha and HDR support. For a deeper comparison, see WebP vs PNG.
| Format | Compression | Transparency | Max dimension | Best for |
|---|---|---|---|---|
| PNG | Lossless (deflate) | Full alpha | 2,147,483,647 px | Text, UI, logos, screenshots |
| JPEG | Lossy (DCT) | None | 65,535 px | Photos, gradients |
| WebP | Lossy or lossless | Yes | 16,383 px | Web delivery, modern stacks |
| AVIF | Lossy or lossless | Yes, plus HDR | Not capped in practice | Next-generation web images |
JPEG Specifics: Quality, Transparency, and Limits
JPEG Is Not a Format for Every Export
JPEG is not a format for every export, even though it is the default almost everywhere. It is a lossy, DCT-based codec built for photographic content, and it has no alpha channel. MDN marks JPEG transparency as not applicable, so every transparent pixel in your markup exports as a solid fill, typically black or white. Need a cutout background? Export PNG, WebP, or AVIF instead.
How the JPEG Quality Setting Behaves
On the canvas path, quality is a number between 0 and 1. MDN's toBlob reference defines it that way for lossy types such as image/jpeg and image/webp, with an unsupported type falling back to PNG per the WHATWG canvas spec. The exact default is user-agent defined, so set the slider explicitly rather than trusting it.
web.dev adds two warnings: "not every tool will interpret a value of 75 the same way," and lower is usually safer than you think, because nudging compression down is "almost always a safe bet." In their Squoosh example, quality 60 cuts file size by 79%. To go further, our image compression guide covers the tradeoffs.
Why Colors Shift After Export: Chroma Subsampling
A JPEG export can look slightly off next to the preview, and the cause is structural. Wikipedia's JPEG reference notes that encoders typically apply 4:2:0 chroma subsampling, which stores color at half the resolution of brightness because eyes tolerate the loss. The codec also works in 8 by 8 DCT blocks, which produces edge noise and ringing on sharp boundaries. Saturated text and thin colored borders show the shift first.
Generation Loss: Export Once
Every JPEG save recompresses the image, and Wikipedia describes the quantization stage as always losing information. Chain a PNG to JPEG to resized JPEG, and each pass compounds the artifacts. Export once from the source markup, then resize with a dedicated tool if you need variants.
JPG vs JPEG: Same Format, Two Spellings
JPG and JPEG are the same format. Both extensions map to the image/jpeg MIME type, and MDN lists .jpg, .jpeg, .jif, .jfif, .pjpeg, and .pjp as equivalent spellings. JPEG names the compression standard the JPEG group created in 1992 (Wikipedia), while JFIF describes the file structure that wraps it.
Control Resolution with devicePixelRatio (Retina / 2x)
MDN defines Window.devicePixelRatio as 1 on a classic 96 DPI display, 2 on a HiDPI or Retina display, and often higher on phones. The docs also warn that "a canvas can appear too blurry on retina screens," and recommend using the ratio to add pixel density.
The scale option multiplies the canvas buffer rather than stretching the CSS box. A 2x export packs four times the pixels of the base box, so detail holds under zoom while the file grows.
DPI vs PPI: Sizing an Export for Print
DPI and PPI are not the same thing. Wikipedia's DPI reference separates them cleanly: DPI counts printer dots per inch of output, while PPI counts image pixels per inch of input. Inkjets run 300 to 720 DPI and lasers 600 to 2,400 DPI, but none of that changes your export, which produces pixels, not dots.
To hit a print target, work backwards from physical size. For a 6-inch-wide image at 300 PPI, export 1,800 pixels wide (6 times 300). The old 72 and 96 PPI desktop baselines live on as the devicePixelRatio 1 default, which is why unscaled exports look soft in print. Check the finished file with the Image Metadata Viewer before sending it to print.
Common Pitfalls and How to Fix Them
A tainted canvas throws a SecurityError the moment a cross-origin image without CORS approval gets drawn, blocking the export (MDN). Most failures trace back to four causes, each with a fix.
External CSS must be inlined. A <link> stylesheet never loads inside the sandboxed SVG render, because the browser will not fetch it there. Inline your rules into a <style> block, or the export arrives unstyled.
Cross-origin images taint the canvas. Set img.crossOrigin = 'anonymous' before the source and confirm the host sends Access-Control-Allow-Origin, or inline the image as a base64 data URL to skip the check.
A transparent PNG usually means the render worked as intended. <foreignObject> renders transparent by default, so an export with no background shows through. Set an explicit background color when you want white behind the content.
Canvas size has limits. Area caps are browser-dependent, and very tall or wide markup can hit data-URI length caps. Prefer toBlob over toDataURL for big exports, because it streams bytes instead of building one giant string.
Browser Support and Standards
The pipeline rests on standardized APIs, so it behaves the same wherever those APIs ship. toBlob and drawImage belong to the WHATWG HTML Living Standard, and <foreignObject> is defined by the W3C SVG spec. Chrome, Edge, Firefox, and Safari all support them, so the converter needs no plugin or install.
Format support follows the browsers rather than the tool. WebP sits at 96.18% support with Safari 16+ on board (caniuse), and AVIF at 94.67% (caniuse). If your target environment is older, export PNG or JPEG, which every browser decodes. web.dev notes AVIF lacks progressive rendering.
Real-World Uses
Documentation screenshots are the most common job: paste a component's HTML and capture a clean PNG for a README without a headless browser. Social and open-graph share cards come next: feed the same template different titles, export at 2x, and size it with the Aspect Ratio Calculator, since 1200 by 630 is the standard OG card.
Bug reports benefit too, because a captured node shows the exact broken state. Email is another fit: many clients strip rich HTML, so teams render a styled block to an image and embed it, a flow our HTML email rendering guide walks through.
When markup spans many pages, use the HTML to PDF Converter instead of one tall image. To capture a live URL rather than pasting markup, the Online Screenshot Tool handles the full page.
Two smaller habits finish the job. Export at 2x when the destination is a slide deck or a zoomable preview, and verify contrast on a white background if you author in a dark theme, since dark-friendly colors can wash out. To iterate on markup before converting, the HTML CSS Playground gives you a live editing surface.
Related Tools
Tweak the result after export with the Image Resizer. Convert vector source with the SVG to PNG Converter, or shift formats using the WebP to PNG JPG Converter. For smaller files, try the PNG JPG Image Compressor. Need exports inline instead of as files? The Base64 Image Encoder wraps any image in a data URI, while the Image Color Palette Extractor pulls brand colors back out of finished captures.
From markup to pixel-perfect export, JPEG, PNG, WebP, or AVIF, the whole render stays on your side of the glass. No upload, no signup, and no markup leaving your device. And when the site takes shape, the Favicon Generator turns one image into every icon size a browser or platform expects.